Creating an AWS Lambda Function Behind a Custom Domain
Published
Recently I published a REST API using AWS Lambda and API Gateway, however I was left with an ugly URL endpoint resembling: https://k19rl1e7mx.execute-api.us-east-1.amazonaws.com/prod/stats
I preferred to put the API behind a custom domain URL that was cleaner and easier on the eyes. Below are the alternatives I considered, as well as some notes on publishing the API.
1. Publishing the REST API
I used the Serverless Framework to publish the REST API into AWS Lambda. I used the aws-nodejs template to auto-generate a base configuration and “helloworld” style endpoint that was ready to be deployed immediately. The Serverless Github page did a great job detailing how to get up and running quickly – definitely worth a peak.
After incorporating my new calculation logic (taking statistics on GPX routes) and tweaking the response object (adding headers to prevent caching), I was ready to deploy into AWS.
Deployment into AWS
Once I had a set of AWS keys from my IAM User, I was ready to deploy. With the Serverless Framework, I was able to set the keys as environment variables and deploy my REST API from a Bash Terminal in one fell swoop:
export AWS_ACCESS_KEY_ID=<AWS Access Key>
export AWS_SECRET_ACCESS_KEY=<AWS Secret Key>
sls deploy
Code Posted on GitHub
For reference, the code for the Serverless Lambda REST API discussed in this article is available on Github here.
2. Responding from a Custom Domain
Once my REST endpoint was deployed and ready to go, I wanted to make it accessible from a custom domain that was easier to read than the gargled mess generated by AWS Lambda.
There were three approaches I considered, each with different degrees of difficulty.
Option A: Serverless Custom Domain Plugin
The simplest approach I found was to use the Serverless Custom Domain Plugin, which automatically takes care of all the domain wiring steps in Option 3 below (creating DNS records in Route53, custom domain mappings in API Gateway, etc.). All you need to do is define the domain in the serverless.yml file – pretty amazing!
One limitation to this approach that ultimately barred me from using it is that it requires the domain DNS to be managed in AWS’s Route53 service.
Option B: Reverse Proxying to the Lambda Endpoint
The next approach I considered was proxying requests through my website’s existing Apache web server. While this did add an extra hop to the request, it allowed me to piggy-back off of my web server’s existing SSL Certificate.

Setting up the reverse proxy was straight-forward, and could be done by adding a few directives to my Apache vhost config. For more information on enabling proxying modules that may not be enabled by default, check out this article.
<VirtualHost *:443>

  ServerName taylor.callsen.me

  # other directives eliminated for brevity

  SSLProxyEngine On
  ProxyPass /api/public/gpxBasicStats/v1/ https://4h9ul1q7mj.execute-api.us-east-1.amazonaws.com/prod/
  ProxyPassReverse /api/public/gpxBasicStats/v1/ https://4h9ul1q7mj.execute-api.us-east-1.amazonaws.com/prod/

</VirtualHost>
Option C: Adding a DNS CNAME pointing Directly to Lambda/API Gateway
In this scenario, API Gateway responds directly to requests on the custom domain, removing the reliance on the reverse proxy and reducing the number of hops request takes to reach the Lambda function.

Loading the Domain Certificate into ACM
Since API Gateway is receiving traffic directly, it needs to present the SSL Certificate for the domain it is responding to. The Certificate for the domain can be loaded into AWS Certificate Manager (ACM) manually, or via the AWS CLI (an example CLI is featured in this article).

Configuring a Custom Domain Name in API Gateway
Next I navigated to the API Gateway administration with the AWS Console. I created a new “Custom Domain Name” entry using the list item on the left, and entered my domain name and selected the matching SSL Certificate.
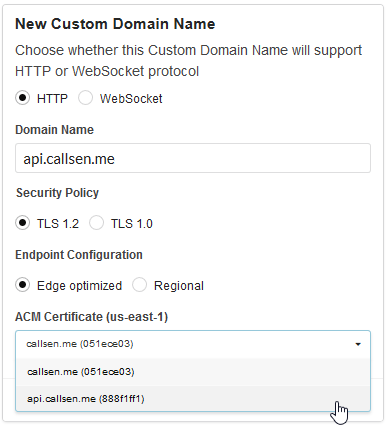
The Custom Domain can take some time to initialize (up to 45 minutes). Once that is complete, the last step is to add a Base Path Mapping to map a URL to the Lambda function created earlier.

The mapping shown above will map requests made to the “v1” path on my custom domain directly to the “prod” stage of my gpxBasicStats Lambda Function:
Custom Domain: https://api.callsen.me/v1/stats
Lambda: https://k19rl1e7mx.execute-api.us-east-1.amazonaws.com/prod/stats
(the bolded portions are specified in the Base Path Mapping)
Creating the DNS CNAME Record
Once the Custom Domain Name mapping is set up in API Gateway, the last step is creating the DNS CNAME entry to forward traffic from the domain over to AWS Gateway (where it finds the mapping we created above).
In my case, I needed to create a CNAME on “api.callsen.me” that pointed to the “Target Domain Name” property of my Custom Domain Name.

Wrapping UP
As I alluded to earlier, I ended up selecting Option B: Reverse Proxying to the Lamba Endpoint. This was the best option for me given that my domain is not managed in Route53 (GoDaddy, yes I’m ashamed) and my Let’s Encrypt SSL Certificates are rotated periodically.
Publishing the Lambda was a lot of fun! JavaScript is just so capable and fun to write. Definitely recommend the Serverless Framework to help out with the AWS wiring. Looking forward to the next one!
Comments
No responses yet