Let’s Encrypt: Integrating Certificate Auto-renewal with AWS CloudFront
Published
I’ve started introducing Let’s Encrypt certificates on my managed sites. Certbot’s Apache plugin does a great job performing the 90-day certificate renewal automatically for basic sites. However, for any sites served through AWS’s CloudFront, new certificates must be imported into AWS and associated with the CloudFront distribution directly (this is because the browser SSL session is terminated at CloudFront, not the Apache web server behind it).
Originally I was importing the Let’s Encrypt certificates manually into AWS’s Certificate Manager (ACM), and then associating the new certificate’s ARN with my existing CloudFront distribution. I realized I could automate this process with newer versions of the AWS CLI.
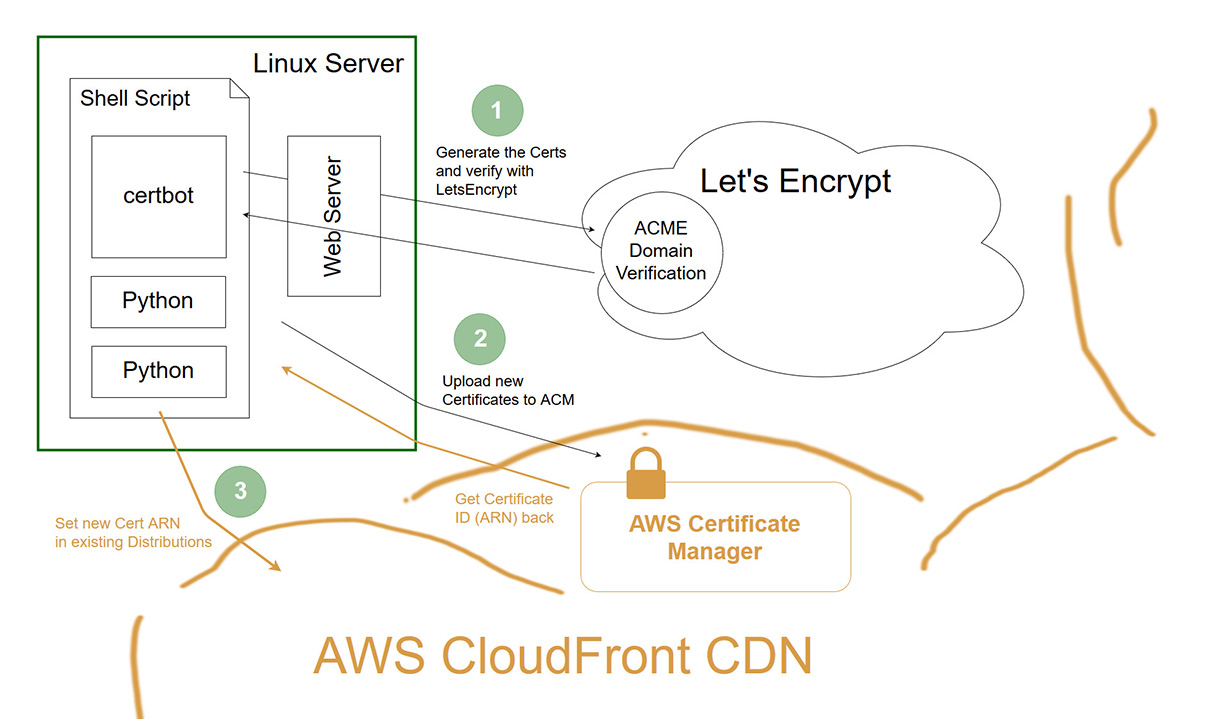
Steps taken to automate Let’s Encrypt Certificate auto-renewal and configuration in AWS CloudFront.
I put together a Bash script that executes on my web server (an Ubuntu host). The script generates a new Certificate with Let’s Encrypt Certbot, imports that script into the AWS Certificate Manager, and then updates my CloudFront distribution with the new Certificate’s ARN. Let’s check it out!
1. Dependencies and Installing the Latest AWS CLI
In the Bash script, I used Python 2.x to parse the JSON in the AWS CLI responses. I ultimately scheduled the script using Crontab. Luckily if you’e using Ubuntu, Python 2.x is available out of the box (and Crontab as well). I already had Let’s Encrypt’s certbot available, so the only dependency I needed to install was the AWS CLI.
I found an updated guide posted by AWS that covers how to install the latest version of the AWS CLI on a variety of different operating systems. On my Ubuntu 20.04 host, I ran the following commands (taken from the guide above):
curl "https://awscli.amazonaws.com/awscli-exe-linux-x86_64.zip" -o "awscliv2.zip"
unzip awscliv2.zip
sudo ./aws/install
2. Creating a Dedicated User/Group in AWS IAM Console
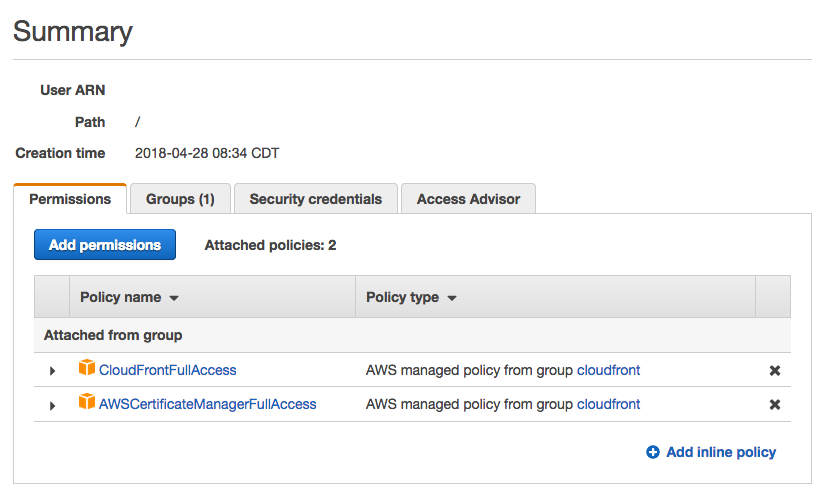
Usage of the AWS CLI requires a set of AWS Access and Secret keys. It’s best practice to use the keys of a dedicated IAM User/Group with the minimum level of permissions required to limit exposure if the keys become compromised.
I was able to perform all functions mentioned in this post with the “CloudFrontFullAccess” and “AWSCertificateManagerFullAccess” policies applied to my User/Group.
3. The Bash Script
The script starts out defining the AWS Access and Secret keys used by the AWS CLI. I recommend setting the region to “us-east-1”, as the AWS CLI “update-distribution” command does not support associating certificates outside of the us-east-1 region.
# AWS Config - recommend using IAM specific user/group with limited permissions!
export AWS_ACCESS_KEY_ID=[INSERT-YOUR-AWS-ACCESS-KEY]
export AWS_SECRET_ACCESS_KEY=[INSERT-YOUR-AWS-SECRET-KEY]
export AWS_DEFAULT_REGION=us-east-1
export AWS_CLOUDFRONT_DIST_ID=[INSERT-YOUR-CLOUDFRONT-DIST-ID]
I execute the certbot command to renew my certificate. I specify “webroot” as the method for the ACME domain ownership challenge, and supply the directory of my website’s root folder. As past of the challenge, the Webroot Plugin creates temporary files inside the site root and confirm they are accessible through the supplied domain (callsen.me in this case).
# Certbot - generate new certificate
certbot certonly --force-renewal --webroot --webroot-path /var/www/blog/ -d callsen.me
Next, I move into the AWS CLI, and supply the paths to the certificate, private key, and chain PEM files created by certbot to the “import-certificate” command.
# AWS CLI - import a new certificate into AWS Certificate Manager
aws acm import-certificate --certificate fileb:///etc/letsencrypt/live/callsen.me/cert.pem --private-key fileb:///etc/letsencrypt/live/callsen.me/privkey.pem --certificate-chain fileb:///etc/letsencrypt/live/callsen.me/fullchain.pem
Jan 2021 Update: AWS CLI version 2 introduced breaking changes related to how files are read and encoded. I updated my code to use fileb:// as a result, however older versions of the AWS CLI may still require file://. Read more here.
In my script, I wrapped the “import-certificate” command above with a $ and Python code to parse the command’s JSON response and save the newly imported Certificate’s ARN into a Bash variable for use later.
# import a new certificate into AWS Certificate Manager, then capture ARN in response
newCertARN=$(aws acm import-certificate --certificate fileb:///etc/letsencrypt/live/callsen.me/cert.pem --private-key fileb:///etc/letsencrypt/live/callsen.me/privkey.pem --certificate-chain fileb:///etc/letsencrypt/live/callsen.me/fullchain.pem | \
  python -c "import sys, json; print json.load(sys.stdin)['CertificateArn']")
Next, I begin preparing for the CloudFront Distribution Configuration update. The full process of updating a Distribution’s Config is outlined here, but to summarize:
- Retrieve the ETag value, which is essentially the version of the Distribution Config
- Retrieve existing Config in JSON format
- Modify the full Config JSON Object to include updates
- Send the full, updated Config JSON Object back to AWS, while supplying the Etag parameter to garuntee the transaction
First, I grab the ETag value and store it in a Bash variable. I make use of the AWS CLI “get-distribution-config” call here.
# retrieve current CloudFront distribution ETag (need to pass this in update-distribution command)
currentCFETag=$(aws cloudfront get-distribution-config --id $AWS_CLOUDFRONT_DIST_ID | \
  python -c "import sys, json; print json.load(sys.stdin)['ETag']")
Next, I use the exact same “get-distribution-config” command to retrieve the Distribution Config JSON and pipe it into Python, where I can easily manipulate the JSON to make the desired Config updates. Once in Python, I change the “ACMCertificateArn” and “Certificate” properties to the new Certificate’s ARN captured earlier.
# retrieve Distribution Config and use Python to set Certificate to newly imported ARN
updatedDistConfig=$(aws cloudfront get-distribution-config --id $AWS_CLOUDFRONT_DIST_ID | \
  python -c "import sys, json, ast; \
    distConfig=json.load(sys.stdin); \
    distConfig['DistributionConfig']['ViewerCertificate']['ACMCertificateArn']='"$newCertARN"'; \
    distConfig['DistributionConfig']['ViewerCertificate']['Certificate']='"$newCertARN"'; \
    print json.dumps(distConfig['DistributionConfig'])")
Finally, I the send the updated Distribution Config back to AWS with the “update-distribution” command. Notice the “–if-match” parameter is being set to the captured ETag value. This is a requirement enforced by AWS, I assume to avoid duplicate or conflicting updates.
# AWS CLI - send updated Distribution Config to AWS; supply ETag to garuntee update
aws cloudfront update-distribution --if-match=''"$currentCFETag"'' --id $AWS_CLOUDFRONT_DIST_ID --distribution-config=''"$updatedDistConfig"''
Here is the complete Bash script:
#!/usr/bin/env bash

# AWS - configure AWS - recommended to use IAM specific user/group with restricted permissions!
export AWS_ACCESS_KEY_ID=[INSERT-YOUR-AWS-ACCESS-KEY]
export AWS_SECRET_ACCESS_KEY=[INSERT-YOUR-AWS-SECRET-KEY]
export AWS_DEFAULT_REGION=us-east-1
export AWS_CLOUDFRONT_DIST_ID=[INSERT-YOUR-CLOUDFRONT-DIST-ID]

# Python - config to parse AWS JSON responses in proper encoding
export PYTHONIOENCODING=utf8

# Certbot - generate new certificate
certbot certonly --force-renewal --webroot --webroot-path /var/www/blog/ -d callsen.me -d taylor.callsen.me

# AWS CLI - import a new certificate into AWS Certificate Manager
newCertARN=$(aws acm import-certificate --certificate fileb:///etc/letsencrypt/live/callsen.me/cert.pem --private-key fileb:///etc/letsencrypt/live/callsen.me/privkey.pem --certificate-chain fileb:///etc/letsencrypt/live/callsen.me/fullchain.pem | \
  python -c "import sys, json; print json.load(sys.stdin)['CertificateArn']")

# retrieve current CloudFront distribution ETag (need to pass this in update-distribution command)
currentCFETag=$(aws cloudfront get-distribution-config --id $AWS_CLOUDFRONT_DIST_ID | \
  python -c "import sys, json; print json.load(sys.stdin)['ETag']")

# retrieve Distribution Config and use Python to set Certificate to newly imported ARN
updatedDistConfig=$(aws cloudfront get-distribution-config --id $AWS_CLOUDFRONT_DIST_ID | \
  python -c "import sys, json, ast; \
    distConfig=json.load(sys.stdin); \
    distConfig['DistributionConfig']['ViewerCertificate']['ACMCertificateArn']='"$newCertARN"'; \
    distConfig['DistributionConfig']['ViewerCertificate']['Certificate']='"$newCertARN"'; \
    print json.dumps(distConfig['DistributionConfig'])")

# AWS CLI - send updated Distribution Config to AWS; supply ETag to garuntee update
aws cloudfront update-distribution --if-match=''"$currentCFETag"'' --id $AWS_CLOUDFRONT_DIST_ID --distribution-config=''"$updatedDistConfig"''
4. Scheduling with CRON
At this point the script was ready, and the last piece of configuration was to schedule it to run regularly within the lifetime of Let’s Encrypt certificates (90 days max). I used an online tool to help assemble the perfect crontab definition, which executes at 10:35am on the 28th day of every 2nd month (arbitrary, but approximately every 60 days).
35 10 28 */2 * /absolute/path/to/my-script/renew.sh
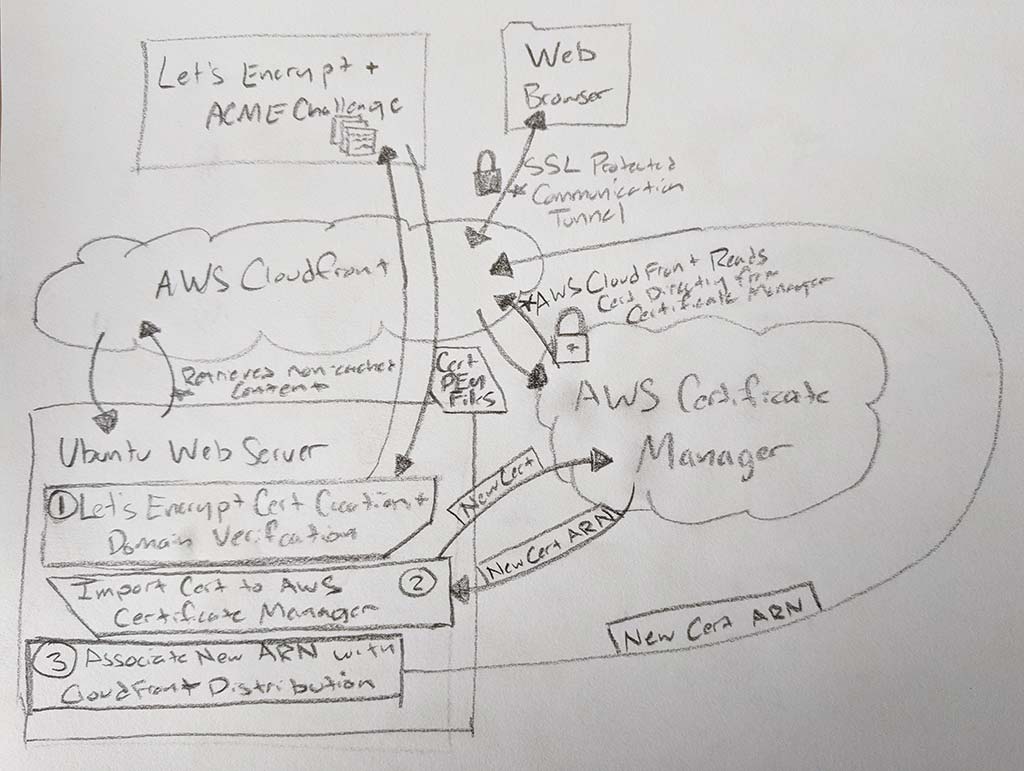
Appendix
Here is an original sketch of the architecture – April 2018
Comments
No responses yet