Setting up CloudFront in front of WordPress 5 and Gutenberg
Published
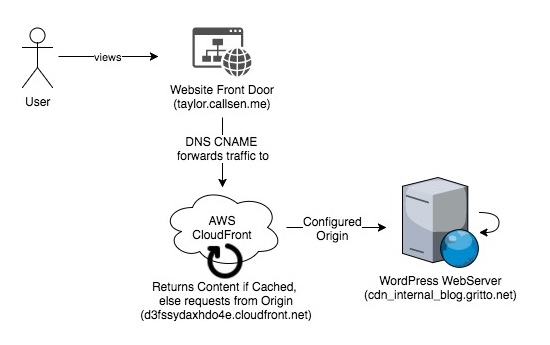
This article discusses how I set up a CloudFront Distribution in front of my WordPress 5 instance. Special steps were taken to enable the Gutenberg Editor as well. At a high setting up CloudFront included:
- Creating a new CloudFront distribution
- Configuring my WordPress Instance as the Default Origin inside in CloudFront
- Configuring a DNS CNAME entry to point to the new CloudFront distribution
Creating the CloudFront Distribution and Default Origin
First I created a new distribution inside of the AWS CloudFront Console. I used the default settings for the majority of the configurations. My WordPress instance was configured to listen to cdn_internal_blog.gritto.net, which I entered as the “Origin Domain Name” (a.k.a. the Default Origin).
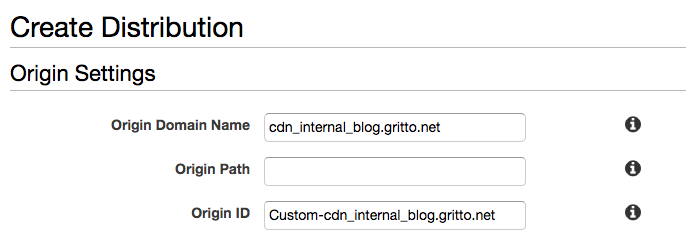
Creating a Custom Origin in CloudFront
I then added the URL that my WordPress instance would respond to (taylor.callsen.me) to the “Additional Domain Names” section. This is important because CloudFront will deny any request whos HOST header does not match a domain listed here.
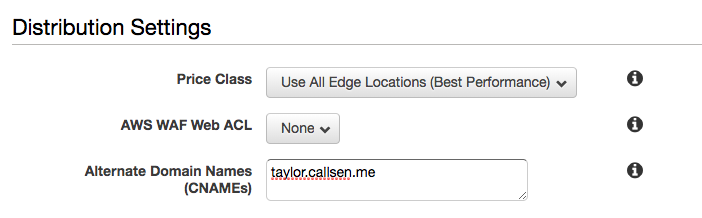
After configuring these two specifics, I was able to accept the rest of the defaults and create the Distribution.
DNS Configuration
While the Distribution was spinning up, I took a second to confirm my DNS settings. I needed to configure my front-door domain (taylor.callsen.me) to point to CloudFront. Inside the DNS Zone Management, I added a CNAME entry that pointed to the new CloudFront Distribution.

Retrieving my CloudFront Domain Name

Creating the corresponding CNAME entry in GoDaddy, pointing to my CloudFront Distribution
At this point, it also made sense to confirm that the DNS for my back-door entry-point was configured correctly. Remember this is the cdn_internal_blog.gritto.net DNS address that CloudFront uses to retrieve content from my actual WordPress instance (which is not accessed directly by users). I opened up the DNS Zone Configuration for gritto.net and confirmed that a CNAME existed for cdn_internal_blog, and that it was pointing directly to my WordPress instance.

Enabling WP-Admin and Gutenberg Editor Passthrough on CloudFront
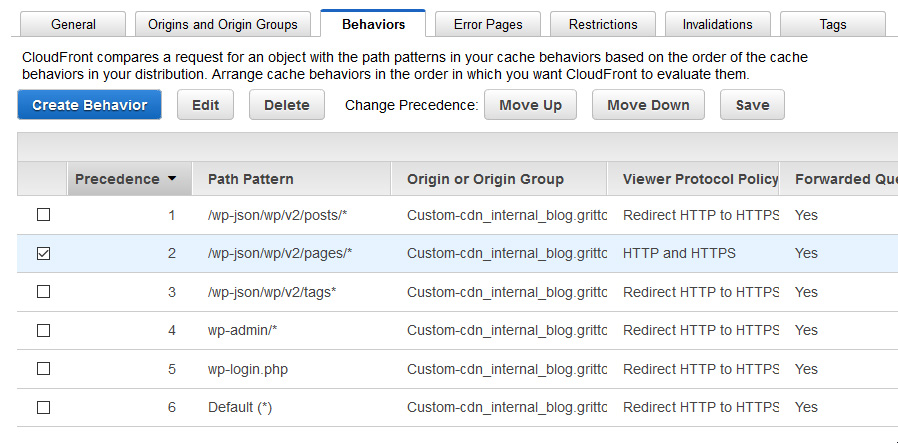
Since the default CloudFront behavior only supports GET and HEAD request, I needed to define five additional “Behaviors” in the AWS CloudFront Console to support WordPress authoring functionality:
- wp-admin/*
- wp-login.php
- /wp-json/wp/v2/posts/* (used by WordPress 5 / Gutenberg editor)
- /wp-json/wp/v2/pages/* (used by WordPress 5 / Gutenberg editor)
- /wp-json/wp/v2/tags* (used by WordPress 5 / Gutenberg editor)
Note: if using RSS feed capabilities, additional behaviors may be needed based on the URL scheme.
Inside of my distribution, I created a new Behavior for each of these path patterns. The behaviors were configured to passthrough all types of HTTP requests, cookies, headers, and query strings. The configuration I used for these Behaviors was (with pass-through options highlighted in red):

WordPress Site Configuration
By now the CloudFront Distribution was spun up, and my DNS settings had been confirmed. Next I needed to take a look at my WordPress configuration. The Home URL and Site URL were still set to my staging/development domain, and needed to be updated. This can be done easily in the WordPress Admin on the Settings > General Page, or directly in the database (the wp_options table has these settings at option_id 1 and 2).

Disabling Canonical URL Redirection
After making these updates, I noticed a strange 302 redirect issue when accessing the homepage through my front-door domain and CloudFront. While users were accessing to site through taylor.callsen.me, CloudFront was retrieving the content from WordPress via cdn_internal_blog.gritto.net. Since I just updated WordPress’s Home and Site URLs to taylor.callsen.me, WordPress was trying to redirect the user (the user actually being the CloudFront distribution) to taylor.callsen.me. This was causing an endless 302 redirect loop.
I needed to disable a feature in WordPress called the “Canonical URL Redirection”, which essentially makes sure that regardless of how a user reached the site, they were redirected so that the URL in the address bar of their browser matched the site’s canonical URL (determined by WordPress’s Site URL option).
Canonical URL Redirection was easy enough to disable, done by simply adding the following to my theme’s functions.php:
// disable WordPress's Canonical URL Redirect feature
remove_filter('template_redirect','redirect_canonical');
Cache Invalidation
One of my favorite quotes is: “there only two hard problems in Computer Science: recursion, cache invalidation, and off-by-one errors”.
To handle cache invaldation on my WordPress site, I use the CloudFront Cache Controller plugin, which automatically sends Cache Invalidations whenever an existing post is updated.
Wrap-up and Other Considerations
Once I performed these steps, I was able to view my WordPress blog through my front door domain (taylor.callsen.me) and see the “Hit from CloudFront” header present. Load times were sped up on my simple site by around half a second, and I expect them to continue to improve as my content gets richer and includes more types of media.
I realized that there are some resources served with my site that should not be cached. One in particular was the sitemap.xml – special precautions had to be taken here to ensure I was always serving the latest sitemap.xml for my website. I could have perhaps defined a special Behavior in CloudFront, or explicitly placed Cache-Control headers on that resource. Luckily as it turns out, the WordPress plugin used for generating the sitemap.xml was taking care of this for me.
Comments
No responses yet