Migrating DAM Assets to Production in AEM
Published
The recommended approach for migrating DAM Assets in AEM is to configure a replication agent from the Staging Author to the Production Author, however this is not always possible (e.g. if servers reside in partitioned networking environments).
The next best approach is packaging up DAM Assets on Staging Author, and manually installing them on the Production Author. The Packages can then be replicated from Author out to the Publish nodes.
I recently had to migrate several gigabytes of Assets for an AEM 6.4 site deployment. During the migration, the most important step was disabling the AEM DAM Workflows on the Production Author and Publish instances. This alleviated the need for the Production servers to process thousands of workflows after the Asset Package installs, bogging down the servers, and potentially leading to crashes.
1. Packaging the DAM Assets
It is sometimes possible to bundle all Assets into a single Package. During this recent deployment however, I was stuck with chunking the Assets into roughly 500 megabytes Packages.
The Disk Usage Report

This Disk Usage Report displays the file size of folders in the CRX (and more importantly, the DAM). This report allowed me to create the appropriate Package Filters so that my Package sizes were sized at around 500 megabytes each.
The report is accessible from: http://localhost:4502/etc/reports/diskusage.html?path=/content/dam
Note: the report will probably fail if run on the root of the repository..
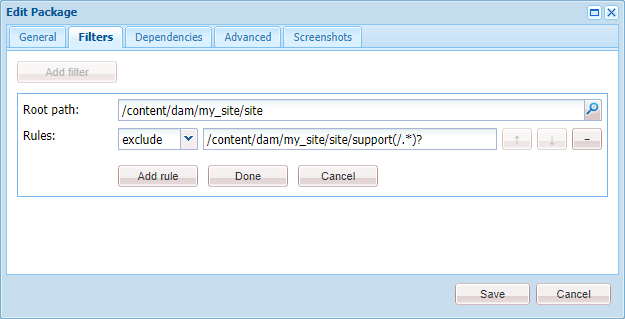
Excluding Paths in the CRX Package Manager
AEM Package Filters can be used to exclude content or directories during Package creation.
For example, when trying to create a 500 megabyte Package with the Asset tree outlined the Disk Usage Report shown above, I packaged everything inside of the /content/dam/my_site/site folder, while excluding the “support” folder, which would have inflated my Package size to well over 500 megabytes.
I did this by adding an “exclude” rule in the Package definition.
The Adobe documentation isn’t great here, but provides some more context if needed.
2. Disabling AEM DAM Workflows
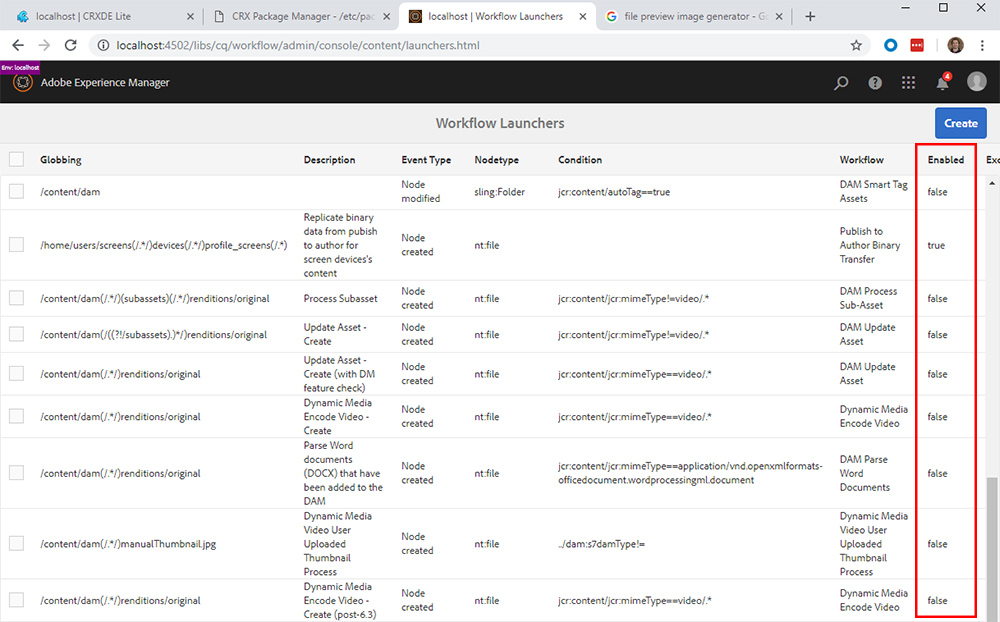
The most important step during an Asset migration is disabling the default AEM DAM workflows. This can most easily be done by disabling the Workflow Launchers, traditionally located in /etc/workflow/launcher/config. In AEM 6.4, Launcher configs were moved to a new location in /libs/settings/workflow/launcher/config.
To override the configs in AEM 6.4, create corresponding nodes under /conf/global/settings/workflow/launcher/config with the “enabled” property is set to false.
I’ve created a Package that will automatically install overridden Launcher configs under /conf to disable the default AEM DAM Workflows. This Package was design to work with AEM 6.4+, and will not work with prior versions of AEM!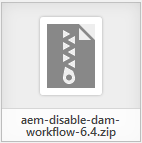
Simply install this package on the Author server to disable Workflows, and uninstall the package when ready to re-enable the Workflows. The package should also be installed on the Publish instances.
Note: Prior to using, confirm that nothing will be overwritten in the /conf/global/settings/workflow/launcher/config folder on the Author and/or Publish instances.
Once installed, confirm that the Workflow Launchers have been disabled by browsing to the Launchers console on the appropriate server: http://localhost:4502/libs/cq/workflow/admin/console/content/launchers.html
3. Deploying the Packages to Production
It is easiest to use cURL commands when transferring packages between Staging and Production instances. Ideally you would SSH into the Production Author, and use cURL to download the packages straight from the Staging Author instance (assuming the two environments can communicate over the network).
Below are some basic cURL commands that interact with AEM’s Package Manager. Adobe also lists several example commands in their documentation.
# download a package
curl -u admin:admin http://localhost:4502/etc/packages/export/my_site_package.zip > my_site_package.zip

# upload and install a package
curl -u admin:admin -F file=@"my_site_package.zip" -F name="my_site_package.zip" -F force=true -F install=true http://localhost:4502/crx/packmgr/service.jsp
If this level of access is not available, downloading and installing packages from the AEM Package Manager GUI is always an option as well.
Be sure to check the available disk space on the Production instances to make sure they can support a large import, and don’t forget to disable the default AEM DAM Workflows prior to importing!
Comments
No responses yet