How to Dockerize a NodeJS App and Deploy it using GitLab CI/CD
Published
A friend recommended I start to “Dockerize” my apps for easy management. He convinced me that containerization was the way of the future, and after a bit of research I realized he was right!
I eventually ironed out a process for containerizing NodeJS apps and configuring auto-deployments via GitLab CI. I thought would be helpful to share what I’ve learned incase it could help others.
Overview
This post walks through code in a sample project I created that cover some basic steps:
- Creating a simple NodeJS REST API and containerizing it into a Docker Image.
- Preparing a Staging Server (Ubuntu) to support the deployment of Docker Images over SSH.
- Configuring a GitLab Project with a CI pipeline that automatically builds and deploys a new Docker Image each time a code commit is pushed.
Once deployed to the Staging Server, the NodeJS REST API is accessible through an Apache web reverse proxy.

Sample Code Posted to GitHub
The same project covered in this post has been posted to GitHub and is available here. The code should be ready to go, and can be used by following the instructions in the README.md.
Assumptions
This guide assumes access to a working GitLab instance, with CI and Runners configured, and also a Docker Container Registry to push and pull Docker Images (this can either be a private GitLab hosted registry, Docker Hub, or any other registry). The first 2 steps in this DigitalOcean guide can help configure the GitLab components if needed. I recommend checking out the DigitalOcean guide in general, as it is very similar to what is covered in this post.
1. Dockerizing the NodeJS App
The sample project contains a basic NodeJS REST API created with Express Application Generator. To run the API locally, launch it with npm start, and execute a GET request to http://localhost:3000/info. The API will generate a JSON response similar to:
{
    "name": "node-docker-gitlab-ci",
    "server": "express",
    "variableData": "NodeJS Code"
}
Now that the NodeJS REST API is working, the next step is to create a Dockerfile and define how Docker will package the API into an Image. I used the Dockerfile in this DigitalOcean guide as a starting point, and tweaked it slightly:
FROM node:14-alpine

# create dir
RUN mkdir -p /home/node/app/node_modules && chown -R node:node /home/node/app
WORKDIR /home/node/app

# build dependencies
COPY ./package*.json ./
USER node
RUN npm install

# copy in source code
COPY --chown=node:node ./ ./

# start express server
CMD [ "npm", "start" ]
While straight-forward, things might get more complicated if the app required keys or variables to pass into the Image. An example of different ways to do this is discussed at the end of this post.
2. Preparing the Staging Server
Next we will prepare the Staging Server to accept deployments over SSH. In this example, we are deploying to a Debian/Ubuntu instance. We will need to:
- Create a new Linux user and add it to the
dockergroup (so that it has access to thedockercommand). - Create an SSH key for the user.
- Configure Apache to proxy web requests back to the Docker container, once deployed.
As described in this DigitalOcean guide, we will create a new user and it to the docker group:
sudo adduser deployer
sudo usermod -aG docker deployer
Next we will create an SSH key for the user. This key will then be added into GitLab so that the GitLab CI Pipeline can log into the Staging Server as this user to make deployments.
# recommended to su into the user to simplify housekeeping
su deployer
ssh-keygen -b 4096
cat ~/.ssh/id_rsa.pub >> ~/.ssh/authorized_keys
Note: we will need the private key generated here in section 4 below. Unless otherwise specified, this value is captured in ~/.ssh/id_rsa.
Once the Linux user is set up, we will configure the Apache web server to proxy requests back to the Docker container. Depending on the current setup, the simplest option may be to define a reverse proxy inside an existing vhost:
# define reverse proxy
ProxyPass /info http://127.0.0.1:8882/info
ProxyPassReverse /info http://127.0.0.1:8882/info

# optional headers - can be omitted
<LocationMatch /info>
  # enable CORS
  Header set Access-Control-Allow-Origin "*"
  Header set Access-Control-Allow-Methods "GET"
  # do not cache
  Header set Cache-Control "no-store, must-revalidate"
  Header set Pragma "no-cache"
  Header set Expires "0"
</LocationMatch>
Notice requests for route /info are proxied to the Docker Container, which will be listening on port 8882. This port will be set during the docker run command, executed in the gitlab-ci.yaml (covered in section 4 below). The CORS and caching directives are optional, and included just in case.
Note: ensure the required Apache modules are enabled to support reverse proxying – see this post for details.
3. Configuring GitLab
Next we will configure GitLab to support CI builds & deployments each time code is committed. Here are a few things inside GitLab that must be configured prior:
- We’ll need a GitLab project to house the code – in this example we use a project called
node-docker-gitlab-ci. - GitLab must have at least one Runner configured – more information available here.
- The GitLab project must enable the Runner in the Settings > CI/CD > Runners section.
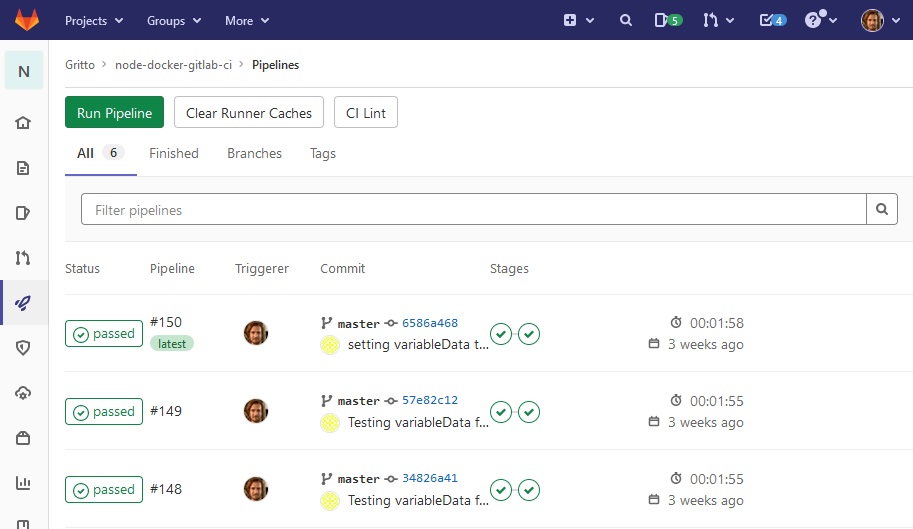
Once these steps are completed, project pipelines will be viewable from within the project’s CI/CD > Pipelines menu.
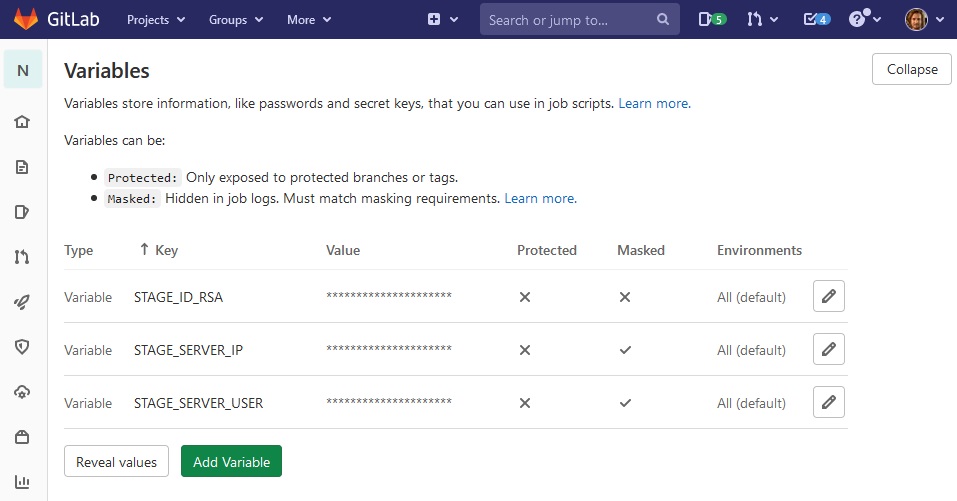
Configuring GitLab CI/CD Variables
The next part of the GitLab configuration deals with setting CI/CD Variables for the node-docker-gitlab-ci project. Once set, these variables can be read from within the gitlab-ci.yaml file, and make a great place for storing keys or other sensitive information.
Inside the project’s Settings > CI/CD > Variables section, we need to create 3 variables:
STAGE_SERVER_IP– contains the IP address of the Staging Server configured in section 2. This is the IP address used to make SSH connections from the GitLab Runner.STAGE_SERVER_USER– contains the user name on the Staging Server, which if following this guide isdeployer.STAGE_ID_RSA– contains the SSH private key for created for thedeployeruser in section 2. This key can be found in~/.ssh/id_rsa. When entering this value in GitLab, make sure the Type is set to “File”, and a newline is created after the-----END OPENSSH PRIVATE KEY-----at the bottom.
4. Enabling the CI Build
The last major piece of this configuration deals with setting up the GitLab CI/CD. This is done by adding a gitlab-ci.yaml file into the root of the node-docker-gitlab-ci project. In the sample project, one has already been provided that looks like:
stages:
  - build
  - deploy-stage

variables:
  VARIABLE_DATA: Gitlab-CI-YAML

build:
  stage: build
  image: docker:18-git
  services:
    - docker:18-dind
  script:
    # get node app version from package.json for use in tagging docker image
    - apk update && apk add jq
    - export VERSION=`jq -r ".version"
There are many great resources that describe GitLab's CI YAML syntax. As we can see, this CI build process has 2 stages, build and deploy. The build stage runs the docker build command, which executes the steps defined in the Dockerfile to build the Docker Image and push it to the configured Docker Container Registry (which is hosted by GitLab in this example).
The deploy stage is a bit more involved, and uses all of the GitLab CI/CD Variables defined in section 3 above (notice the STAGE_ID_RSA, STAGE_SERVER_USER, and STAGE_SERVER_IP). This stage will create an SSH session into the Staging Server, using the deployer user's SSH key. While on the Staging Server, it will then pull down the newly built Docker Image, and install it into the local Docker runtime.
Finally, the last line of the YAML file issues the docker run command, which will start the Docker Container, define network ports, and pass in any environment variables used inside the Image.
Once the gitlab-ci.yaml file is commit to the repo, its off to the races!

Where to Store Keys and Variables
One issue that may come up when defining CI/CD builds is where to define keys, passwords, and other sensitive information. Especially when dealing with Docker, care has to be taken to ensure access keys do not get baked into Docker Images during the build.
In section 3 above, we defined our server keys in the GitLab project's CI/CD Variables. While this worked well, we could have also stored this information in the gitlab-ci.yaml file, Dockerfile, or even in the NodeJS code itself. While variables are a bit more "hard-coded" when defined in these files, it can be useful for items that are less sensitive, and rarely change (e.g. an AWS key pair ID).
Here are examples of defining the variableData value from the NodeJS REST API response in different the different CI/CD build scripts (and then reading it from the gitlab-ci.yaml file):
- Defined in the
docker runcommand in thegitlab-ci.yaml- commit - value is hard-coded and passed into the Docker container as an environment variable (later read by the NodeJS app). - Defined in the
Dockerfile- commit - value is written into a.envfile created during Docker Image build, which is then read by the NodeJS app. - Defined in the NodeJS code itself - commit A and commit B - removing the
variableDatadefinition from both thedocker runcommand and theDockerfilemeans the default value set in the NodeJS code will be returned.
Improvements
While this approach has worked well for a few different projects, I would like to eventually move away from opening up SSH access on my servers, especially to a user in the docker group (close to root permissions). I've tried to mitigate this by incorporating some SSH best practices (e.g. changing the default port, only allowing certain IP addresses to connect, rotating keys, etc.). I will continue to look into remote deployments with Docker in hopes of finding something that feels more secure!
Comments
No responses yet